How To Get The Best Bargain Whenever Buying Power Amplifiers

Senin, 31 Maret 2014

By Mike Heller


Selecting a decent amplifier for your loudspeakers is not a trivial chore. You wish to make certain that your amplifier matches your speakers. I will clarify some important amplifier terms and give some recommendations to help you select the perfect amplifier.

Audio amplifiers appear in all different shapes and sizes. They use different technologies and have many technical specs. By following some simple rules, you will be able to pick the type that best fits your application and budget.

Amplifiers vary in their size and range from types that will take up a good part of your living room whilst some of the latest mini amplifier types are as small as a deck of cards. A large number of amps are the size of a typical rack. This enables your amp to be stacked on top of your other audio equipment. The huge majority of recent audio amplifiers are solid state amplifiers versus more conventional tube amplifiers. Tube amplifiers have been dominant a decade or so ago. Regrettably, tube amps have relatively large audio distortion which describes how much the audio signal is degraded by the amplifier.

Tube amps will have audio distortion of up to 10%. Solid state amplifiers will have less audio distortion depending on the amplifier technology that is utilized. Several of the most accepted technologies in the past have been "Class-A" and "Class-AB" technologies. These technologies use different arrangements to amplify the sound. Amps based on any of these technologies are also named "analog amplifiers". While amplifiers employing these technologies normally have low audio distortion, power efficiency is only 10% to 30%. This means that the majority of the electrical power provided to the amp is wasted as heat while a tiny fraction is used to amplify the audio signal.

In comparison, "Class-D" amps which are also known as "digital amplifiers" have a power efficiency of usually 80 to 90%. This allows the amp and power supply to be made a great deal smaller than analog amplifiers. The downside is that many digital amplifiers have larger audio distortion than analog amplifiers though several of the latest types make use of a feedback mechanism to minimize distortion to levels of 0.05% and less.

"Class-D" amplifiers, on the other hand, which are also named "digital amplifiers" have a power efficiency of no less than 80% and are smaller and have a smaller power supply than similar analog amplifiers. The disadvantage is that many digital amps have larger audio distortion than analog amplifiers although some of the latest types employ a feedback mechanism to reduce distortion to levels of 0.05% and less. The amp should be able to deliver adequate output power to sufficiently drive your speakers which will depend not only on how much power your loudspeakers can handle but also on the size of your listening environment. Speaker power handling is given as peak power which describes the maximum amount of power during short bursts while average power refers to how much power the loudspeakers can handle constantly.

If you have a fairly small listening area then 20 to 50 Watts of power should be sufficient despite the fact that your loudspeaker might be rated for 100 Watts or more. Low-impedance speakers generally offer high sensitivity and are easier to drive to high volume than high-impedance loudspeakers. Be sure that your amplifier can drive your speaker impedance. You can without problems find the rated speaker impedance range in your amplifiers user manual.

Last but not least, be certain that your amplifier introduces little noise and has a broad enough frequency response. High-quality amps will have a signal-to-noise ratio of no less than 100 dB and a frequency response of a minimum of 20 Hz to 20 kHz.


About the Author:


Read More..

Personal computer Find Lenovo ThinkCentre M92p Black Desktop Computer 2121D6U

Search for Lenovo ThinkCentre M92p Black Desktop Computer - 2121D6U via the internet

Scores: Lenovo ThinkCentre M92p Black Desktop Computer - 2121D6U

Lenovo ThinkCentre M92p Black Desktop Computer - 2121D6U

Lenovo ThinkCentre M92p Black Desktop Computer - 2121D6U over the internet

The M92 offers your enterprise legendary performance, unparalleled energy efficiency - including the ultracompact tiny model - plus vPro manageability on the M92p. Get tiny and go big. The Lenovo ThinkCentre M92/M92p is designed for extended lifespan with reliability, manageability, and sustainability. Desktop maintenance is hassle free with 15-month life cycle and high platform stability through Intel Stable Image Platform Program (SIPP). In addition, the Intelligent Cooling Engine (ICE2) helps you manage desktop acoustics and cooling as required-Choose your desktop from the tower, small form factor, or the new tiny form factor specifically designed to suit your need. The new-tiny form factor is the industry first 1L Intel vPro desktop along with VESA mount support for multiple mounting options - including-at the back of a supported monitor-Powered by the latest 3rd generation Intel Core processors, the ThinkCentre M92/M92p provide uncompromised performance across form factors. Maximize system efficiency with Lenovo Enhanced Experience 3 and RapidBoot HDD accelerator. Gain greater performance with support for Intel Smart Response Technology. The desktop is loaded with the industry leading features for communications and enhanced user experience-The ThinkCentre M92/M92p offers all that you need to work in peace of mind - the best performance, enhanced productivity, and-renowned reliability-Specifications-ThinkCentre M92p Tiny, 3/3 Warranty, Display Port Cable, Intel Core i5-3470T Processor, 2.9GHz, 3MB Cache, 4GB DDR3 Memory, 500GB 7200RPM HDD, Windows 8 Pro 64bit downgrade Windows 7 Pro 64bit with Win 8 Pro 64 RDVD, Slim DVD+/-RW Writer, Gigabit Ethernet Adapter, Integrated Intel Graphics, Integrated Audio, Lenovo USB Preferred Pro Full Size Keyboard, Lenovo Enhanced Optical USB Mouse, Internal Mono Speaker, Wireless WLAN Intel N105 802.11b/g/n, 4 x USB 2.0 & 1 USB 3.0, 3 Years Warranty. -Monitor is not included

Read more »
Read More..

LUPO 2 5 Multimedia Computer Speakers

Minggu, 30 Maret 2014


LUPO 2 5 Multimedia Computer Speakers


LUPO 2 5 Multimedia Computer Speakers is one of the bestseller product in the market today. People arround United Kingdom is looking for LUPO 2 5 Multimedia Computer Speakers with low prices from Internet. If youre lucky you can get a special discount from Amazon, only in this month. Well, good product that comes with low prices is everyone choices.

Available now at cheap price, special discounts and fast shipping. I am very satisfied with their qualities and recommend it to all people hunting for a top quality item with the newest specifications at an reasonable. You can read review from buyers to find out more from their experience. LUPO 2 5 Multimedia Computer Speakers has worked wonders for me and I hope it would do wonders on you too. Why then spend any more time? Enjoy yourself, you understand where to shop the best ones.

Some of the customer reviews speak that the LUPO 2 5 Multimedia Computer Speakers are splendid luggage. Also, It Is a pretty well product for the price. It’s great for colony on a tight budget. We’ve found pros and cons on this type of product. But overall, It’s a supreme product and we are well recommend it! When you however want to know more details on this product, so read the reports of those who have already used it.


LUPO 2 5 Multimedia Computer Speakers is a good choice with brand new features that will make you amaze. But if you still want to have another information about LUPO 2 5 Multimedia Computer Speakers, you can read more detail information, spesification, and reviews from people that bought LUPO 2 5 Multimedia Computer Speakers below.

LUPO 2 5 Multimedia Computer Speakers Detail Information :


This Page is a participant in the Amazon Services LLC Associates Program, an affiliate advertising program designed to provide a means for sites to earn advertising fees by advertising and linking to Amazon.co.uk
CERTAIN CONTENT THAT APPEARS ON THIS SITE COMES FROM AMAZON SERVICES LLC. THIS CONTENT IS PROVIDED "AS IS" AND IS SUBJECT TO CHANGE OR REMOVAL AT ANY TIME.

Read More..

Divoom Europe GmbH BLUETUNE 2 Bluetune

Sabtu, 29 Maret 2014


Divoom Europe GmbH BLUETUNE 2 Bluetune


Divoom Europe GmbH BLUETUNE 2 Bluetune is one of the bestseller product in the market today. People arround United Kingdom is looking for Divoom Europe GmbH BLUETUNE 2 Bluetune with low prices from Internet. If youre lucky you can get a special discount from Amazon, only in this month. Well, good product that comes with low prices is everyone choices.

For sale now at cheap price, promo discounts and super shipping. I am quite satisfied with their features and recommend it to everyone hunting for a top quality product with the useful specifications at an cheap. You can read testimony from buyers to find out more from their experience. Divoom Europe GmbH BLUETUNE 2 Bluetune has worked wonders for me and I wish it would do wonders on you too. Why then waste any more time? Enjoy yourself, you understand where to buy the best ones.

Most people reviews speak that the Divoom Europe GmbH BLUETUNE 2 Bluetune are splendid luggage. Also, It Is a pretty well product for the price. It’s great for colony on a tight budget. We’ve found pros and cons on this type of product. But overall, It’s a supreme product and we are well recommend it! When you however want to know more details on this product, so read the reports of those who have already used it.


Divoom Europe GmbH BLUETUNE 2 Bluetune is a good choice with brand new features that will make you amaze. But if you still want to have another information about Divoom Europe GmbH BLUETUNE 2 Bluetune, you can read more detail information, spesification, and reviews from people that bought Divoom Europe GmbH BLUETUNE 2 Bluetune below.

Divoom Europe GmbH BLUETUNE 2 Bluetune Detail Information :


This Page is a participant in the Amazon Services LLC Associates Program, an affiliate advertising program designed to provide a means for sites to earn advertising fees by advertising and linking to Amazon.co.uk
CERTAIN CONTENT THAT APPEARS ON THIS SITE COMES FROM AMAZON SERVICES LLC. THIS CONTENT IS PROVIDED "AS IS" AND IS SUBJECT TO CHANGE OR REMOVAL AT ANY TIME.

Read More..

Computer system Discover the best buy designed for Lenovo Commercial Systems Lenovo TopSeller ThinkStation E31 3 2GHz Xeon QC Windows 7 Professional 64 bit 3695H6U

Jumat, 28 Maret 2014

It is possible to best to buy pertaining to Lenovo Commercial Systems Lenovo TopSeller ThinkStation E31: 3.2GHz Xeon QC Windows 7 Professional 64-bit 3695H6U Cheap

Ratings: Lenovo Commercial Systems Lenovo TopSeller ThinkStation E31: 3.2GHz Xeon QC Windows 7 Professional 64-bit 3695H6U

Lenovo Commercial Systems Lenovo TopSeller ThinkStation E31: 3.2GHz Xeon QC Windows 7 Professional 64-bit 3695H6U

Lenovo Commercial Systems Lenovo TopSeller ThinkStation E31: 3.2GHz Xeon QC Windows 7 Professional 64-bit 3695H6U Low Cost

The game-changing Lenovo ThinkStation E31 series offers the performance and reliability you need on a budget you can afford. The E31 workstation is equipped with up to a high-performance Intel Xeon processor and error correcting memory to deliver top quality, professional results at an entry-class price point. And professional results require powerful graphics. The ThinkStation E31 supports Intel HD Graphics using main memory, along with models configured with discrete graphics to support multi-displays.

Read more »
Read More..

The Shutdown Timer App for Your Computer

Kamis, 27 Maret 2014

shutdown timer appThe Shutdown Timer app is perfect for you if you don’t have the time to worry about whether or not you shut off your computer or not. The timer will shut down or reboot your computer whenever you set it to perform such actions. You can set it to do this based on CPU or RAM utilization or even CPU temperature. You can either put your computer into sleep or standby mode. Shutdown Timer can really help to save energy when you aren’t utilizing your computer.

Shutdown Timer runs on both Windows Vista and Windows 7. With the program, you are able to install a sidebar app that gives you single-click access to view Shutdown Timer, and you are able to use a portable version that can be dropped on a USB flash drive to be downloaded on a different computer.

Once Shutdown Timer is installed, you are given the ability to set a scheduled computer shut off time for every day of the week. You also may set it to reboot every day at a certain time or lock on its screen at certain points throughout the day. This is a great feature if you want to make sure that your computer will be turned off when you aren’t at home.

As mentioned before, you can set your computer to shutdown or reboot when certain conditions occur. For example, you can set your computer to shutdown or reboot when you reach a certain point of CPU or RAM utilization. Also, you can do the same thing if your computer is overheating because of something that you are not there to monitor. This can help to safely power down your computer without any possible damaging effects.

The Shutdown Timer app is a very handy tool. It can do more than just turn your computer on and off when you need it to, it can monitor your computer while you are not utilizing it. Another great thing is that its free! If you’re looking for anything like this for your computer, then you should definitely check it out.

Looking for Computer / PC Rental information? Visit the www.rentacomputer.com PC Rental page for your short term business PC needs. Or see this link for a complete line of Personal Computer Rentals.
Read More..

I cant belive I found this in a CAD file!

Rabu, 26 Maret 2014

While working on a file today I came across a bit of text that must have been pasted into the file by accident:


It seems that somebody was watching HULU at work one day, found the link to an episode of "Greys Anatomy" and pasted it into this DWG file instead of their browser!  OOPS!!!  I guess they just got busted for goofing off at work!
Read More..

Online CAD Resource CAD Forum

I would like to tell you about another online resource for CAD users. It is CAD Forum. It is an online forum discussing CAD issues and procedures. I have found help there and I have been able to provide help to others too.

CAD Forum is a Czech-based website available also in English and German. It contains 1.600+ free CAD tips and tricks for AutoCAD, Civil 3D, Revit, etc., discussion forum, CAD blocks library (incl. 3D blocks), free utilities and other CAD resources.

I recommend it.
Read More..

RECHARGEABLE PORTABLE BUILT IN EEARPHONE FUNCTION

Selasa, 25 Maret 2014


RECHARGEABLE PORTABLE BUILT IN EEARPHONE FUNCTION


RECHARGEABLE PORTABLE BUILT IN EEARPHONE FUNCTION is one of the bestseller product in the market today. People arround United Kingdom is looking for RECHARGEABLE PORTABLE BUILT IN EEARPHONE FUNCTION with low prices from Internet. If youre lucky you can get a special discount from Amazon, only in this month. Well, good product that comes with low prices is everyone choices.

For sale now at cheap price, special discounts and easy shipping. Im extremely satisfied with their qualities and recommend it to anyone hunting for a top quality item with the latest specifications at an reasonable. You can read review from buyers to find out more through their experience. RECHARGEABLE PORTABLE BUILT IN EEARPHONE FUNCTION has worked wonders for me and I believe it will do wonders on you too. So why waste much more time? Enjoy it, you understand where you can shop the best ones.

Most of the customer reviews speak that the RECHARGEABLE PORTABLE BUILT IN EEARPHONE FUNCTION are splendid luggage. Also, It Is a pretty well product for the price. It’s great for colony on a tight budget. We’ve found pros and cons on this type of product. But overall, It’s a supreme product and we are well recommend it! When you however want to know more details on this product, so read the reports of those who have already used it.


RECHARGEABLE PORTABLE BUILT IN EEARPHONE FUNCTION is a good choice with brand new features that will make you amaze. But if you still want to have another information about RECHARGEABLE PORTABLE BUILT IN EEARPHONE FUNCTION, you can read more detail information, spesification, and reviews from people that bought RECHARGEABLE PORTABLE BUILT IN EEARPHONE FUNCTION below.

RECHARGEABLE PORTABLE BUILT IN EEARPHONE FUNCTION Detail Information :


This Page is a participant in the Amazon Services LLC Associates Program, an affiliate advertising program designed to provide a means for sites to earn advertising fees by advertising and linking to Amazon.co.uk
CERTAIN CONTENT THAT APPEARS ON THIS SITE COMES FROM AMAZON SERVICES LLC. THIS CONTENT IS PROVIDED "AS IS" AND IS SUBJECT TO CHANGE OR REMOVAL AT ANY TIME.

Read More..

Japan Creates Worlds Fastest Supercomputer

Senin, 24 Maret 2014

Japan K Computer
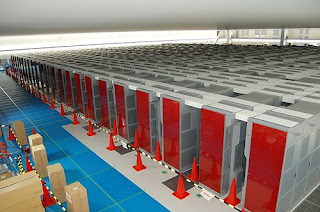
When it comes to the most powerful supercomputers in the world, I dont think it is to anybodys great surprise that the most powerful one is located in Japan. This new Japanese supercomputer has just recently earned the top spot among all the supercomputers in the world with a performance that makes other supercomputers look like a TI-82.

Known as the "K Computer", this device is three times faster than its closest rival from China, which previously held the number one spot, according to Professor of Electrical Engineering and Computer Science at the University Tennessee at Knoxville Jack Dongarra. Dongarra also keeps the official rankings of computer performance.

The K Computer, which was created by Fujitsu and is located at the Riken Advanced Institute for Computational Science in Kobe, Japan, represents an incredible step forward in the realm of speed. This computer will also, more than likely, become a great sense of national pride for Japan, especially for computer scientists, who take the race to have the fastest computer in the world very seriously.

According to Dongarra, "Its a very impressive machine. Its a lot more powerful than the other computers." The latest ranking of the top 500 computers is determined with a simple mathematical equation. The computer who gets to take the top spot is able to make 8.2 quadrillion calculations per second which also calculates to 8.2 petaflops per second. The performance of the K Computer is the same as linking around 1 million desktops.

Supercomputers have many uses including earthquake simulations, climate modeling, nuclear research and weapons development and testing. Businesses also use supercomputers for oil exploration as well as rapid stock trading. However, building a supercomputer isnt cheap and it usually involves connecting thousands of small computers in a data center.

The K Computer is made up of 672 cabinets filled with system boards. The K Computer is considered to be energy-efficient even though it uses enough electricity to power around 10,000 homes at an estimated cost of $10 million annually. Id hate to see the statistics for the non-energy-efficient ones. The lab that the K Computer calls home is planning on increasing the size of the computer to 800 cabinets which is predicted to raise the speed of the supercomputer that is already faster then its five closest competitors.

The K Computer received its name from the Japanese word "Kei" which translates to 10 quadrillion, the overall goal for the number of calculations the supercomputer should be able to perform. The previously leading supercomputer was Chinas Tianhe-1A which was located at the National Supercomputing Center in Tianjin, China. The Tianhe-1A was the first Chinese supercomputer to hit the top spot which acted as a beacon of the countrys growing technological prowess.

The fastest supercomputer in the United States is located at the Oak Ridge National Laboratory in Oak Ridge, Tennessee. It placed third behind the K Computer and the Tianhe-1A. Countries in Asia have made sizable investments in supercomputing and currently dominate the upper echelon of the field. Japan and China alone hold four out of the top five spots.

However, when it comes to the top 10, the United States is still the leader, holding five of the top 10 spots. Japans top supercomputer ranking marks the countrys first since 2004. The United States and China were previously the only countries to hold that title. These rankings, issued every six months, are frequently changed and reflect just how fast computer power is advancing.

Source: The New York Times - Japanese K Computer Is Ranked Most Powerful

Power Point Projectors
Most business class projectors will do a good job displaying your PowerPoint presentation. If you have a small presentation group, a 2000 lumen LCD projector will be able to produce a nice and clear picture. For larger audiences you should consider a 5000 lumen LCD projector.
Read More..

Dell Announces Mike Ming Urban Designs on Studio 15 17 Series Laptops

Minggu, 23 Maret 2014

Enhancing personal expression and style, Dell today launches five bold and contemporary Special Art Edition designs for the Dell Studio 15 and 17 laptops, exclusively created by urban artist Mike Ming. Building off of the inaugural Ming art work for the Inspiron 1525 laptop, Dell extends its offering with new designs that showcase Ming’s fluid organic style. Pictured below is the red swirl, which is one of the new urban designs.

Brooklyn-based artist Mike Ming (born Michael Miyahira) blends popular culture, motion and emotion to communicate his visual world. According to Ming, "The technology behind creating Dells Art House series of laptops allows me to share my visual creations with people who are inspired by art and who want to express their own individually unique sense of style."

Read More..

Multileader Styles

Sabtu, 22 Maret 2014

AutoCAD 2008 gave us Multileaders. I have previously posted on them here and spoke about their general use, multi leadered leaders. Now lets take a look and see how to set up a Multileader style.

Let’s start by creating a new Multileader Style. A Multileader style works just like any other style in AutoCAD. In fact, it has many of the same settings as the dimension styles do. Open up the Multileader style manager. Click the NEW button on the right. It starts you off by copying one of your current styles from the drawing file.

There is a default style called STANDARD. I recommend that you create your own default style that is called anything else except standard. This is true for all styles, if you can help it. The reason is that everyone using AutoCAD has a style called standard because it comes that way. If anyone copies your Multileader (or text, or dimension, or etc.) from your file and places it in theirs, it will take on the style attributes called standard that are in their file. Their STANDARD style might not be set the same way yours is! But if you give it a unique name, it is less likely to take on the wrong attributes.

I will call this one ml-001. No reason, only that it isn’t standard. When you give your new Multileader style a name, you have the option of making it annotative or not (meaning that it will be scaled by the annotative scaling feature.) Don’t worry, you can change this later if you wish.

The style Manager has three different tabs; Leader Format, Leader Structure, and Content.

Leader

This is where you set the type, color, linetype, arrowhead, and break size.Most of these items are pretty easy to understand, so I won’t go over every setting option. But here are what I feel are the most important:

  • Type:Straight, spline or none.The straight setting creates a “straight” lined leader.The spline creates a curved lined leader.
  • Color, Linetype, Linewight: use these to set the color, linetype, and lineweight for the leader.
  • Arrowhead Symbol/Size: This works just like the dimension style setting for arrowhead. Choose one or choose a to use a block you created. That is what your arrowhead will be and what size it will be.
  • Leader Break Size: Controls the settings used when adding a dimension break to a multileader.

Leader Structure

This tab is where you can set the constraints, structure and scale of the multileader:

  • Constraints-Maximum Leader Points: Specifies a maximum number of points for the leader line.
  • First Segment Angle: Specifies the angle of the first point in the leader line.
  • Second Segment Angle: Specifies the angle of the second point in the multileader landing line.
  • Landing Settings: Controls the landing settings of the multileader.
  • Automatically Include Landing: Attaches a horizontal landing line to the multileader content.
  • Set Landing Distance: Determines the fixed distance for the multileader landing line.
  • Scale: Controls the scaling of the multileader.
  • Annotative: Specifies that the multileader is annotative.

When the multileader is not annotative, the following options are available.

  • Scale Multileaders to Layout: Determines a scaling factor for the multileader based on the scaling in the model space and paper space viewports.
  • Specify Scale: Specifies the scale for the multileader.

Content

This tab contains the controls for the content of the multileader style.

  • Multileader type: You can choose from Mtext, Block, or None.

Here are the options associated with the Mtext type Multileader:

  • Default text: this text will be inserted in to the leader by default. You can always change it.
  • Text Angle: Always right reading, As Inserted, or Keep Horizontal.
  • Style, Color, Height: set the text style, color and height.
  • Always Left Justify: well, check this box and your multileader text will always be left justified.
  • Frame Text: Check this box and your text will have a frame around it.
  • Leader Conection – Left Attachement: if your text is on the left, then this setting tells AutoCAD where to place the landing, center, top, bottom, etc.
  • Leader Connection-Right Attachement: same as above, but when on the right.
  • Landing Gap: the gap between the landing and the text.

Here are the options if BLOCK is set for the multileader type:

  • Source Block: choose form several premade blocks, or create your own.
  • Attachment: sets how the block will be attached to the leader.
  • Color: set the color

Most of these settings are obvious and are easily figured out. Some might be a little tricky. Just set these the way you want them and save the style.

Happy CADDING.
Read More..

AUGI November Hotnews is Out

Jumat, 21 Maret 2014

AUGI’s official monthly email newsletter “AUGI HotNews - November 2008” hits the streets and the ‘inboxes’ of its members.

My favorite of course is this months TIPniques: DO YOU HAVE STYLE? Wonder why I like it so much?

Here is a list of some of the other articles in this months edition. They are even better than the TIPniques article.

Read More..

The Truth About Exercise BBC Horizons

Kamis, 20 Maret 2014

This time I will not discuss about IT or InfoSec but health. The following is a video, which was produced by BBC in 2012, talking about keeping fit with HIT (High Intensive Training) and LIT (Low Intensive Training) without sweating. Ideal for busy people like us.


BBC Horizons (January 2012) - The Truth About Exercise from Henry Dimaano on Vimeo.

Read More..

HOWTO Send Mail to GMail by Postfix on Ubuntu Server 10 10

Rabu, 19 Maret 2014

You cannot send any mail to GMail from you mail server, unless you set GMail server as your SMTP server.


Step 0 :


Install the Ubuntu Server 10.10 and select Mail Server when install.


Step 1 :


sudo nano /etc/postfix/transport


Append the following line.


*     smtp:[smtp.gmail.com]:587


Step 2 :


sudo nano /etc/postfix/sasl/sasl_passwd


Append the following line.


[smtp.gmail.com]:587     samiux@gmail.com:password


Step 3 :


sudo nano /etc/postfix/main.cf


Add or make the change of the following lines.


relayhost = [smtp.gmail.com]:587

smtp_sasl_auth_enable = yes

smtp_sasl_password_maps = hash:/etc/postfix/sasl/sasl_passwd

smtp_sasl_security_options = noanonymous

smtp_tls_CAfile = /etc/postfix/cacert.pem

smtp_use_tls = yes

mynetworks = 192.168.0.0/24 127.0.0.0/8 [::ffff:127.0.0.0]/104 [::1]/128


Step 4 :


cat /etc/ssl/certs/Thawte_Premium_Server_CA.pem | sudo tee -a /etc/postfix/cacert.pem


Step 5 :


sudo postmap /etc/postfix/transport

sudo postmap /etc/postfix/sasl/sasl_passwd


Step 6 :


sudo /etc/init.d/postfix restart


Thats all! See you.
Read More..

What is a Class

Selasa, 18 Maret 2014

Welcome back to Java Code Online. Class is the most commonly thing in Java. Having a good understanding of class is essential for getting a firm grip on the Principle of OOPS and Java itself. A class is called the blueprint of an Object. Everything that is done in Java, has to be enclosed within a class.

As I said before that the class is a blueprint of an Object, it is used for making Objects. I Java we know that everything is an Object, and if we dont know then we must know this. Java is built on the Principle of OOPS and is totally Object Oriented. So Java see everything as an Object.

I will take you through a through understanding of this concept. A class is used to define a new data type, and normally a separate class is used to make Objects of this new data type. Think of a class as something which defines what an Object knows and what an Object does. Therefore a class is also called a template for an Object and an Object is called an instance of the class. Thus a class contains the instance variables (things which an Object knows) and methods (things which an Object does).

A class is just like a blueprint and it covers every intricate detail about the Object that will be made from it. The normal structure of class is that it defines everything about an Object, so suppose that your application consists of some Objects, and so you make classes for each. Now you define a main class which will initiate all the calling procedure.

The main class always contain the method "main". This method tell the JVM that this is the main class and it need to start execution from here. Once in the main class, you can define Objects of other classes that you have made. I will take a simple example to clarify my point.

// This program declares two Car objects.
class Square {
int width;
int height;
}

class SquareDemo2 {
public static void main(String args[]) {
Square mySquare1 = new Square();
Square mySquare2 = new Square();
int area;
// assign values to mySquare1s instance variables
mySquare1.width = 10;
mySquare1.height = 20;
/* assign different values to mySquare2s instance variables */
mySquare2.width = 15;
mySquare2.height = 15;
// compute area of first Square
area = mySquare1.width * mySquare1.height;
System.out.println("Area is " + area);
// compute area of second box
area = mySquare2.width * mySquare2.height;
System.out.println("Area is " + area);
}
}

The first System.out.println results in:- 200
The second System.out.println results in:- 225


Now you must be wondering about so many new things, I have shown above. I will cover each of them.

Here we have defined two classes Square and SquareDemo2. The first class is used for making an Object of type Car. The second Class uses this new data type for making new Objects. Now as told before, the execution begins from the class containing the "main" method.

Now as you can see that there are two different outputs for the two Objects, this shows that both the Objects are unique and are independent of each other. Here System.out.println is used for displaying the results at the console or output screen.

The lines starting with // are skipped by the Java compiler. Infact the // is the syntax for Comment in Java. These are very helpful in explaining the functioning of the code.

If you have any problems with the code that I have explained right now, then do leave me a comment and I will try my best to clarify your doubt.

The most important thing that you must have noticed here is the parameter "new". This is the magic keyword of Java and is used for creating new Objects. I will discuss more on creating a new Object in my later posts.

I hope the article was helpful in explaining you about What is a Class. If you like this article then do leave a comment. For more information on Java, keep buzzing Java Code Online.
Read More..

Best Practices to write JUnit test cases in Java

Sabtu, 15 Maret 2014

JUnit best practices in Java
No doubt writing good JUnit test cases is a rare skill just like writing good Code. A good, well thought and well written JUnit test can prevent several production issues during initial development or later maintenance in Java application. Though one can only be perfect in writing JUnit test by practice and a level of business knowledge which is important to envision different scenarios on which a method gets called, some best practices or experience of other developer may help to guide other programmers. In this Java article I am sharing some JUnit tips and Junit best practices which I have learned and follow while writing unit tests using JUnit for Java programs. One of the book which helped me a lot is Pragmatic Unit Testing in Java with JUnit by Andrew Hunt and Dave Thomas,  This book shares lot of JUnit best practices which is worth reading and learning if you are serious about Unit testing using JUnit. Never undermine importance of automated testing and test cases written by Developer who writes the code and that's the reason many company are asking programmer to design, code and provide unit tests during there Java interviews. These JUnit best practices not just apply to JUnit but to any other testing framework as well like TestNG, they are more on testing and writing test cases which is more important skill than tool like JUnit or TestNG.
Read more »
Read More..

Remove Snap do

A concerned reader asks: Snap.do has hijacked my web browser. Is it safe? How do I get rid of it? Heres what you need to know about this so-called Snap.do hijacker malware.

Snap.do is a browser help object. Authors of this web browser plug-in say that they want to enhance your web browser and simplify the way you search the web, share favorite information, work or even play. Sounds good, right? It seems that they really care and want to help you. But hold your horses, Jack! :) Things are often not what they seem to be and thats particularly true for snap.do web browser hijacker. It comes with a cost and the main question is: are you willing to pay the price?


First of all, snap.do and some other Resoft products are considered to be potentially harmful or even malicious, not to mention how annoying they can be. For example, TrendMicro, an antivirus company, classifies snap.do toolbar as spyware and web browser hijacker and they have a good reason for that. According to Resoft privacy policy, their products, including snap.do collect the following information:
1. The Internet domain and IP address from which you access the Resoft Products;
2. Screen resolution of your monitor;
3. The date and time you access the Resoft Products;
4. The page you are visiting with the Resoft Products
5. If you linked to a Resoft website from another referring website, the address of that website.
By using the Resoft Products, you are consenting to have your personal data transferred to and processed both within and without the United States of America
Typically, snap.do installs itself as a web browser toolbar (BHO) but it may be installed with additional functionalities as well. This browser helper object can be downloaded from its official website and may also arrive bundled with other software, usually freeware. We havent seen any questionable routines or drive-by downloads that might be related to malicious software and snap.do. Whats interesting, though, installers downloaded from free video streaming sites and other shady or rogue websites are very aggressive and even if users made sure that the check boxes asking to install add-ons were disabled, snap.do virus was still installed on their computers.

Snap.do works on all major web browsers: Google Chrome, Mozilla Firefox and Internet Explorer. It doesnt work on Windows XP. Installer simply fails to initialize properly. So, XP users are safe. Once installed, Snap.do hijacker modified various web browsers settings. It changes home page to http://feed.helperbar.com and adds additional search engine provider which redirects users to http://search.snap.do. Each time user opens a new tab the web browser goes to http://search.snap.do instead of blank page, Google or any other website of your choice.

Snap.do removal can be a really challenging task, especially when it comes bundled with other software. Even though, snap.do authors ensure that it can be uninstall from a computer very easily, using the programs own normal uninstallation process, but thats not quite true. It leaves so many modified web browser settings and Windows registry keys and you cant ignore them because they simply change the way you use your web browser. For example, even if you removed Snap.do via Control Panel, modified search engine settings remain untouched. As a result, searching directly from web browser address bar returns results from http://search.snap.do rather than Google. By the way, the plug-in modifies Windows registry and enables its automatic execution at every system start-up. What is more, snap.do infection may cause your web browser to stop working.

To remove snap.do from your computer, please follow the removal instructions below. It will show you how to remove this browser hijacker in Mozilla Firefox, Google Chrome and Internet Explorer. Make sure to uninstall snap.do via Control Panel first and only then proceed to the next steps, unless of course its not listed there. Have you been hijacked by Snap.do? Post your comment or question below. Good luck and be save online!


Snap.do removal instructions:

1. First of all, download recommended anti-malware software and run a full system scan. It will detect and remove this infection from your computer. You may then follow the manual removal instructions below to remove the leftover traces of this browser hijacker. Hopefully you wont have to do that.


2. Go to the Start Menu. Select Control PanelUninstall a Program.


3. Search for Snap.do in the list. Select the program and click Uninstall button to uninstall it.


It will prompt you to close all web browsers before uninstalling Snap.do. Please click Yes to continue.

Then, it will ask you if you want to change your home page and default search provider to the old settings. Please click Yes.


Remove Snap.do in Google Chrome:

1. Click on Customize and control Google Chrome icon. Go to ToolsSettings.


2. Click Set pages under the On startup.


Remove feed.snap.do by clicking the "X" mark as shown in the image below.


3. Click Show Home button under Appearance. Then click Change.


Enter http://www.google.com instead of feed.snap.do and click OK to save changes.


4. Click Manager search engines button under Search.


Select Google or any other search engine you like from the list and make it your default search engine provider.


Select Web (search.snap.do) from the list and remove it by clicking the "X" mark as shown in the image below.


Thats it!


Remove Snap.do in Mozilla Firefox:

1. Open Mozilla Firefox. Go to ToolsAdd-ons.


2. Select Extensions. Remove Snap.do extension. Close the window.


3. Click on the Snap.do search icon as shown in the image below and select Manage Search Engines....


4. Choose Web Search (Snap.do) from the list and click Remove to remove it. Click OK to save changes.


5. Go to ToolsOptions. Under the General tab reset the startup homepage or change it to google.com, etc.


6. In the URL address bar, type about:config and hit Enter.


Click Ill be careful, I promise! to continue.


In the filter at the top, type: snap.do


Now, you should see all the preferences that were changed by Snap.do extension. Right-click on the preference and select Reset to restore default value. Reset all found preferences!


Thats it!


Remove Snap.do in Internet Explorer:

1. Open Internet Explorer. Go to ToolsManage Add-ons.


2. Select Search Providers. First of all, choose Bing or Live Search search engine and make it your default web search provider (Set as default).


3. Select Web Search (search.snap.do) and click Remove to remove it. Close the window.


4. Go to ToolsInternet Options. Select General tab and click Use default button or enter your own website, e.g. google.com instead of http://feed.snap.do. Click OK to save the changes. And thats about it for Internet Explorer.


If you did everything correctly, the Snap.do search hijacker should be completely uninstalled from your computer. However, if it still shows up, you will have to modify or remove certain Windows registry keys. They are listed below.

First, you have to open Windows Registry Editor. Simply search for regedit and run it as administrator.

Once there, navigate to, and delete the following Windows registry keys:
  • HKEY_CURRENT_USERSoftwareMicrosoftInternet ExplorerMain → delete "Search Bar"
  • HKEY_CURRENT_USERSoftwareMicrosoftInternet ExplorerSearch → delete "Default_Search_URL"
  • HKEY_CURRENT_USERSoftwareMicrosoftInternet ExplorerSearch → delete "SearchAssistant"
  • HKEY_LOCAL_MACHINESOFTWAREWow6432NodeMicrosoftInternet ExplorerSearchUrl → delete "Default"
Then, navigate to, and modify the following Windows registry keys:

HKEY_CURRENT_USERSoftwareMicrosoftInternet ExplorerMain

Right-click the "Search Page" key and select Modify. Change key value data to: http://go.microsoft.com/fwlink/?LinkId=54896

HKEY_LOCAL_MACHINESOFTWAREWow6432NodeMicrosoftInternet ExplorerSearchScopes{006ee092-9658-4fd6-bd8e-a21a348e59f5}

Right-click the "URL" key and select Modify. Change key value data to:
http://www.bing.com/search?q={searchTerms}

Share this information:
Read More..

Comparison of Free Vs Paid Internet Security Top 10 Free and Paid Products

Jumat, 14 Maret 2014

First it is useful to point out who is choosing free software vs. paid programs. When new computers are sold, they are typically pre-loaded with at least one full featured security suite - available as a free trial for a month or two. This recommended paid product is optional and is made available for those who are new to computers, and may not be aware that alternatives exist, or where to go to find them - knowing that most who default into this category will opt to follow recommendations and stay with, and pay for the program.
On the other hand, if youve been around the block a few times, you have by now enough savvy to know that anyone will try to sell you anything. Youre likely aware of other options and programs available to achieve the same results - whether self taught, by word of mouth, or doing your own web research. Regardless, you still end up wondering how exactly can free internet security compare or compete with the paid versions?
Contents: Whats the difference?
Paid internet security suites are designed for optimal performance and dependability. They include all the components that make up a comprehensive package for maximum computer protection - and feature live, accessible customer service. These components are a combination of - anti-virus, anti-spyware, ad ware, anti-malware, a firewall, anti-phishing detection, and recently, some form of live, real-time protection - detecting any malware activity - which may already be in progress - by continuous scanning for anything out of the ordinary. Protection like this is found in the full-featured, all-in-one, or premium security suites.
Free versions are individual components used in combination with other free components to custom build a comprehensive security defense. The idea is that combining individual free programs - achieves the same level of protection found in the paid versions. For example, I may start with a free anti-virus, then add a free anti spyware, adware, and malware program, then consider a firewall, and some sort of real-time protection to expose suspicious activity unidentified by all the others. These components together essentially resemble what you will find in an all-in-one security suite. Though I may not have access to customer support, how often really will I need to contact them? Maybe only if their service is unavailable for some reason, which usually means its on their end anyway - and will soon be resolved.
Performance: Is one more effective than another?
The answer is - not by much. Ive reviewed various results published by reliable sources. The trend seems to favor the paid products, but only by about 1% to 10% average, regarding performance and dependability. Ive put together a list consisting of the most highly rated free and paid internet security software offers. According to most resources available, these 2 groups reflect the most commonly agreed upon results. They are not in any particular order - as they seem to vary slightly from year to year. The fact that they are or have been consistently highly rated, and remain in the top 10, supports their reputation. Keep in mind that most free versions of internet security, also offer paid upgrades as well - usually named something like Pro, or Premium. You can search and compare them on your own if interested in knowing more about specific features or details for each.
Free Internet Security:
1. Avast.com - Antivirus
2. Avira.com or Antivir
3. AVG.com Antivirus
4. ZoneAlarm Firewall - Checkpoint.com (formerly Zonelabs)
5. Adaware - Lavasoft.com
6. Microsoft Security Essentials - microsoft.com/security_essentials
7. Comodo.com
8. Threatfire.com - (compliments most other components with real-time protection)
9. PandaSecurity.com - Panda Cloud
10. SUPERAntiSpyware.com - Super Antivirus
Paid Internet Security Suites:
1. Symantec.com - Norton Antivirus
2. McAfee.com
3. Avast.com - Premium
4. Kaspersky.com - Kaspersky Lab Internet Security
5. Gdatasoftware.com - G-Data.
6. Bitdefender.com
7. PCTools.com - Internet Security
8. F-Secure.com
9. Webroot.com - Webroot Internet Security Essentials
10.Trendmicro.com - Trend Micro
There are very good reasons supporting both decisions:
The consensus seems to validate that free versions are as reliable as the paid ones. People who tend to know more about internet security and are more computer/internet savvy in general will recommend the free products hands down. But their preferences are based on knowledge that many of us neither have, nor are even interested in - which is a solid argument for: go ahead and pay - they know more than I do. So it really comes down to what kind of operator are you? Do you have work to do and dont mind paying for reliable protection and piece of mind? Or are you more inclined to decide for yourself which components to include in your customized defense? There will always be choices - free alternatives to just about anything you can install on your computer.


Article Source: http://EzineArticles.com/5884961
Read More..

Autodesk Homestyler App for iPad Released

Kamis, 13 Maret 2014


Autodesk has released another free iPad design app.  This time it is their Homestyler home design software.  Homestyler has been around since 2010 as a browser based program.  This program provides a 2D or 3D design tool that helps in interior design and floor layout.  Contractors can use it for remodels, architects can use it to quickly generate a floor plan, and interior decorators can choose from a multitude of commercially available appliances, furniture, doors, windows, and other finishing touches in a range of colors and designs.


Homestyler allows for real time design that can blend high-quality 3D models from popular products.  It is very simple to use and is now an iPad app.  This is a great platform for this type of design tool.  Designers can take their iPad to a client meeting or on the job site and quickly generate a design plan.  One of the great benefits to using Homestyler is the fact that users can access a library of design items that actually exist in the real world.

“ Weve taken home design to a new level of ease with the Homestyler app for iPad. The app is unique because it can transform a single snapshot into a virtual home design playground,” said Samir Hanna, vice president of Consumer Products at Autodesk. “Extending this technology on iPad lets our users express their creativity on the go, tap the existing vibrant community to find inspiration for their home and showcase their personal style with greater ease than ever before.”

“The Homestyler app lets users tap into more than 1,500 Sherwin-Williams colors for inspiration as they create their perfect space," says Jackie Jordan, director of color marketing, Sherwin-Williams. "Color is a critical element of design, and the new iPad app is a great way to explore the impact of different hues and the relationship between wall colors and furnishings."

You can read more about this new app from Autodesk’s Press Release.
You can try the Homestyler app on iTunes.
No iPad, you can go to the browser based version.

Now Autodesk, release this for Android.

Read More..

HOWTO nVidia CUDA 4 0 RC on Ubuntu 10 10 Server

Rabu, 12 Maret 2014

If you have nVidia display card that have several CUDAs on it, you will interested in this tutorial. This time, I would like to show you how to install CUDA 4.0 RC on Ubuntu 10.10 Server.


You will experience a faster server after the installation of CUDA 4.0.


This HOWTO does not require to install X.


Step 1 :


Add the CUDA 4.0 PPA.

sudo add-apt-repository ppa:aaron-haviland/cuda-4.0


Step 2 :


sudo apt-get update

sudo apt-get upgrade


64-bit :

sudo apt-get install nvidia-cuda-gdb nvidia-cuda-toolkit nvidia-compute-profiler libnpp4 nvidia-cuda-doc nvidia-current-modaliases libcudart4 libcublas4 libcufft4 libcusparse4 libcurand4 nvidia-current nvidia-opencl-dev nvidia-current-dev nvidia-cuda-dev nvidia-kernel-common opencl-headers


32-bit :

sudo apt-get install nvidia-cuda-gdb nvidia-cuda-toolkit nvidia-compute-profiler lib32npp4 nvidia-cuda-doc nvidia-current-modaliases lib32cudart4 lib32cublas4 lib32cufft4 lib32cusparse4 lib32curand4 nvidia-current nvidia-opencl-dev nvidia-current-dev nvidia-cuda-dev nvidia-kernel-common opencl-headers


Step 3 :


sudo nano /etc/init.d/nvidia_cuda


Append the following lines.


============= Copy from here ================

#!/bin/bash


PATH=/sbin:/bin:/usr/bin:$PATH


/sbin/modprobe nvidia


if [ "$?" -eq 0 ]; then


   # Count the number of NVIDIA controllers found.

   N3D=`/usr/bin/lspci | grep -i NVIDIA | grep "3D controller" | wc -l`

   NVGA=`/usr/bin/lspci | grep -i NVIDIA | grep "VGA compatible controller" | wc -l`


   N=`expr $N3D + $NVGA - 1`

   for i in `seq 0 $N`; do

      /bin/mknod -m 666 /dev/nvidia$i c 195 $i;

   done


   /bin/mknod -m 666 /dev/nvidiactl c 195 255


else

   exit 1

fi


=========== Copy to here =================


Step 4 :


sudo chmod +x /etc/init.d/nvidia_cuda

sudo update-rc.d nvidia_cuda defaults


Step 5 :


Reboot your system.


Remarks


I do not have nVidia display cards server in hand at the moment, I am not sure the captioned startup script working properly or not.


Thats all! See you.
Read More..

Want to ask Autodesk a Question

Selasa, 11 Maret 2014

My last post, Does Autodesk Listen to its Users?, asked you if you thought Autodesk listens to its users, as the title implies. If you havent already, participate in the poll. Select the percentage that you feel Autodesk does listen at.

I want to steal (I mean borrow) another idea from Steve Johnson and give you a chance to ask Autodesk a question.

Keep it reasonable, and like Steve said, they wont be able to answer pricing questions. But what do you want to know? Release cycle issues, major bugs, whats in store for AutoCAD, Revit, Civil3D, etc.

I am going to San Francisco in two days for a meeting with Autodesk. There will be many bloggers there, members of the press, and Autodesk officials. I will be able to speak with several officials, so if you have a simple enough question post it here as a comment and I will see what I can find out. I can not make any promises except that I will try. I know, there is no try, only do or do not, but I will see what I can do!

What do you want to know?
Read More..

Does Autodesk Listen to its Customers Part 2

Senin, 10 Maret 2014

I asked on a previous post if you thought Autodesk listened to its customers. I just spent a day at the Autodesk office in San Francisco taking with several people from Autodesk. I was also able to spend some time with fellow blogger Steve Johnson. He took the time to interview three key people at Autodesk. They were: Shaan Hurley, Eric Stover, and Jon Page. I wanted to make sure you had to opportunity to watch Steves video interview. There are two of them and they provide a detailed response to this question.

Video 1

Video 2

Thank you Steve for conducting these interviews and for providing us with this valuable info. Great job as always Steve.
Read More..

AutoCAD WS 1 6 1 Released – AutoCAD Utility Design Now Supported


Autodesk released the latest version of AutoCAD WS (mobile version 1.6.1) for the web based version as well as the iOS and Android versions.  All versions are up to date and match each other.  These latest versions support AutoCAD Utility Design drawings.  According to the Google Play Store and Apple App Store, various bug fixes are also addresses.

See the AutoCAD WS blog post here about this update.


Read More..

How to use Twitter Bootstrap with Asp Net MVC 3

Minggu, 09 Maret 2014

What is Twitter Bootstrap (TB) ?
  • TB is a Free (open source) collection of tools for creating web applications
  • It contains HTML and CSS-based design templates for typography, forms, buttons, charts, navigation and other interface components
  • As well as optional JavaScript extensions
  • TB has supported for HTML5 and CSS 3
  • It is compatible with all major browsers
  • It also supports Responsive Design
           - This means the graphic design of web pages adjusts dynamically, taking into account
              the characteristics of the device used (PC, tablet, mobile phone)


Twitter Bootstrap


How to Download Twitter Bootstrap ?


Step 1 :

Download Twitter Bootstrap

Step 2 : 
  • After unzip the content,You will have below mentioned folders
After unzip the content

  • CSS folders content is as below

CSS folders content

  • IMG folders content is as below

IMG folders content

  • JS folders content is as below

JS folders content


How to create Asp.Net MVC 3 project using Visual Studio 2010 ?

Step 1 :  Click,  File ==> New Project

New Project


Step 2 :  Select, Internet Application Template

Select, Internet Application Template


Step 3 :  MVC 3 Internet Application Template generated Solution Explore is as below

Complete project


How to add Twitter Bootstrap UI Framework for Asp.Net MVC 3 project ?

css and img :
  • Create a folder named "bootstrap" under the Content folder
  • Create 2 sub-folders named "css" and "img" under that
  • Add the .css files into css folder and .png files into img folder

Note: The framework assumes that the .png images are located under a folder
           named "img" under the parent folder of the folder in which the .css files are located  

scripts :
  • Create a folder named "bootstrap" under the Scripts folder
  • Add the bootstrap javaScript files into it

After that solution explore looks like below

Complete project


Lets try to add Bootstrap effects into our Asp.net MVC project

How to Add the Bootstrap CSS ?
  • Open the _Layout.cshtml page
  • Add the following 2 lines in the head tag at the end of its existing content
  • You dont need to remove any of its existing content   
  • You need to make sure that bootstrap-responsive.min.css appears after the bootstrap.min.css 

<head>
<link href="@Url.Content("~/Content/bootstrap/css/bootstrap.min.css")"
      rel="stylesheet" type="text/css" />
<link href="@Url.Content("~/Content/bootstrap/css/bootstrap-responsive.min.css")"
      rel="stylesheet" type="text/css" />
</head>


How to Add Bootstrap JavaScript ?
  • It is a good practice to add the JavaScript files at the end of the page content
  • Add the following line at the end of the _Layout.cshtml file before ending the body tag

<script src="@Url.Content("~/Scripts/bootstrap/bootstrap.min.js")"
        type="text/javascript"></script>


Lets add some Twitter Bootstrap css styles for our Asp.Net MVC UIs

Site.css
  • Open the Site.css file
  • Look for the "header h1, #header h1" styled item
  • Replace it with the following code block   

header h1, #header h1
{
    font-weight: normal;
    padding: 5px 0;
    margin: 0;
    color: #5c87b2;
    border: none;
    line-height: 2em;
    font-size: 20px !important;
    text-shadow: 1px 1px 1px #111;
}

  • Look for #logindisplay, #logindisplay a:link, #logindisplay a:visited and #logindisplay a:hover styled items
  • Change the color property to #555 instead of white
  • Replace it with following code block   

#logindisplay
{
    font-size: 1.1em;
    display: block;
    text-align: right;
    margin: 10px;
    color: #555;
}

#logindisplay a:link
{
    color: #555;
    text-decoration: underline;
}

#logindisplay a:visited
{
    color: #555;
    text-decoration: underline;
}

#logindisplay a:hover
{
    color: #555;
    text-decoration: none;
}

Lets Modify Body 
  • Open _Layout.cshtml page
  • Replace it with following code block  

_Layout.cshtml (complete code)

<!DOCTYPE html>
<html>
<head>
<meta charset="utf-8" />
<title>@ViewBag.Title</title>
<link href="@Url.Content("~/Content/Site.css")" rel="stylesheet"
      type="text/css" />
<link href="@Url.Content("~/Content/bootstrap/css/bootstrap.min.css")"
      rel="stylesheet" type="text/css" />
<link href="@Url.Content("~/Content/bootstrap/css/bootstrap-responsive.min.css")"
      rel="stylesheet" type="text/css" />
</head>

<body>
    <div class="container-fluid">
        <div id="header" class="row-fluid">
            <div id="title">
                <h1>
                    My MVC Application</h1>
            </div>
            <div id="logindisplay">
                @Html.Partial("_LogOnPartial")
            </div>
        </div>
        <div id="" class="row-fluid">
         <div class="navbar">
           <div class="navbar-inner">
             <div class="container-fluid">
               <div class="nav-collapse">
                 <ul class="nav">
                   <li class="@(ViewBag.Active == "Home" ? "active" : "")">
                       @Html.ActionLink("Home", "Index", "Home")
                    </li>
                    <li class="divider-vertical"></li>
                    <li class="@(ViewBag.Active == "About" ? "active" : "")">
                       @Html.ActionLink("About", "About", "Home")
                    </li>
                  </ul>
               </div>
             </div>
          </div>
         </div>
        </div>
      <div id="" class="row-fluid">
         @RenderBody()
      </div>
      <div id="footer" class="row-fluid">
      </div>
    </div>

    <script src="//ajax.googleapis.com/ajax/libs/jquery/1.9.0/jquery.min.js">
           </script>
    <script src="@Url.Content("~/Scripts/bootstrap/bootstrap.min.js")"
            type="text/javascript"></script>
</body>
</html>


Lets Modify Home Page
  • Open Index.cshtml page
  • Replace it with following code block 

Index.cshtml (complete code)

@{
    ViewBag.Title = "Home Page";
    ViewBag.Active = "Home";
}
<div class="hero-unit">
    <h2>@ViewBag.Message</h2>
    <p>
        This is a template to demonstrate the way to beautify the default
        MVC3 template using Twitter Bootstrap website. It is pretty
        simple and easy.
    </p>
    <p>
        <a href="http://asp.net/mvc" class="btn btn-primary btn-large"
           style="color: White;">
         To learn more about ASP.NET MVC visit &raquo;</a>
    </p>
</div>


Lets Modify About Page
  • Open About.cshtml page
  • Replace it with following code block 

About.cshtml (complete code)

@{
    ViewBag.Title = "About Us";
    ViewBag.Active = "About";
}
<div class="row-fluid">
    <div class="span4">
        <h2>
            About 1</h2>
        <p>
            Your About 1 details.Your About 1 details.Your About 1 details.
            Your About 1 details.Your About 1 details.Your About 1 details.
            Your About 1 details.Your About 1 details.Your About 1 details.
        </p>
        <p>
            <a class="btn" href="#">View details &raquo;</a></p>
    </div>
    <div class="span4">
        <h2>
            About 2</h2>
        <p>
            Your About 2 details.Your About 2 details.Your About 2 details.
            Your About 2 details.Your About 2 details.Your About 2 details.
            Your About 2 details.Your About 2 details.Your About 2 details.
        </p>
        <p>
            <a class="btn" href="#">View details &raquo;</a></p>
    </div>
    <div class="span4">
        <h2>
            About 3</h2>
        <p>
            Your About 3 details.Your About 3 details.Your About 3 details.
            Your About 3 details.Your About 3 details.Your About 3 details.
            Your About 3 details.Your About 3 details.Your About 3 details.
        <p>
            <a class="btn" href="#">View details &raquo;</a></p>
    </div>
</div>


Thats it.Youre done.

  • Now the Asp.net MVC 3 project with Twitter Bootstrap Template should look like below

Home page (portion)

Home page


About page (portion)

About page


Do you need to Download This Sample Project ?


Do you need to dive deep ends of  Twitter Bootstrap ?


Conclusion
  • Bootstrap is a Toolkit from Twitter designed to kick-start development of web-apps and sites
  • You can design highly professional and more sophisticated web sites with minimum effort by using Bootstrap
  • It is Tested and supported in the major modern browsers, such as the Latest versions of Safari, Google Chrome, Firefox 5+, and Internet Explorer 7+
  • With Bootstrap 2.0 and later, Mobile browsers are also supported
  • So Try to use TB with your web projects and Enjoy it 


I hope this helps to You.Comments and feedback greatly appreciated.

If you feel it was a good article,Give me a +1.Thank You.


Happy Coding.

May Be Useful for You

How to Improve jQuery Selector Performance ?
How to Enable jQuery Intellisense in Visual Studio 2010 ?
Read More..